Python(tkinterで〇進数変換アプリ)
tkinterモジュールを利用することで簡単にGUIアプリを作成することができます。
tkinterでウィジェットを作成する方法を確認し、簡単な〇進数を10進数に変換するツールを作成しました。
tkinterについて詳しくはこちら
Tk を用いたグラフィカルユーザインターフェイス
import tkinter as tk
#from tkinter import messagebox as mb # ダイアログ表示のサブモジュール
import tkinter.messagebox as mb # インポートの方法2
import tkinter.filedialog as fdlg # ファイルダイアログ表示のサブモジュール

root = tk.Tk()
root.title("tkinter sample") # ウィンドウタイトルの設定

# ラベルの配置
label1 = tk.Label(root,text="This is a sample text")
label1.pack()
label2 = tk.Label(root,text="Label-2")
label2.pack()
label3 = tk.Label(root,text="Label-3")
label3.pack(side="left")
tk.Label(root,text="Label-4").pack(side="left")
tk.Label(root,text="Label-5").pack(side="bottom")
tk.Label(root,text="Label-6").pack(side="top")

# エントリーの配置
entry = tk.Entry(root)
entry.pack()
entry.get() # entryの値を取得

# ボタンの配置
b=tk.Button(root,text="press it!")
b.pack()

# 設定の変更
label2.config(bg="pink") # 背景色の設定
label2.config(fg="red") # 文字色の設定
label3.config(fg="white",bg="black")
label2.config(text="New Text")
label7=tk.Label(root,text="Label-7",bg="green")
label7.pack()

# エントリーに事前に値を挿入
entry.insert(0,"String")
entry.insert(0,"-----")

# ボタンを押したときの処理を設定
#b.config(command= lambda :print("PRESSED!"))
#b.config(command= lambda :print("Entry:",entry.get()))
b.config(command= lambda :label3.config(text=entry.get()))

# ウィンドウの大きさ変更
#root.geometry("500x400")
#root.geometry("+100+500") # 配置位置の指定
root.geometry("400x300+100+500")

# ダイアログの表示
mb.showinfo("info","message")
mb.showerror("info","message")
mb.askyesno("info","終了しますか?")
mb.askokcancel("info","終了しますか?")

# ファイルダイアログの表示
fdlg.askdirectory() # ファイルのディレクトリパスを返す
fdlg.askopenfilename() # 開くファイルの名前をディレクトリパスを含めて返す
fdlg.asksaveasfile() # ファイルの保存確認
以前の投稿でも扱っている内容ですので、コード説明はコメントをチェックして下さい。
また、ラベル、1行入力ボックス、ボタン、チェックボックスについては、以下のサイトが分かりやすかったです。
2進数→10進数変換ツール
import tkinter as tk

root = tk.Tk()
root.geometry("250x100")
root.title("2進数→10進数変換")
tk.Label(root, text="2進数を入力してください").pack()

entry=tk.Entry(root)
entry.pack()

def convert():
    src=entry.get()
    try:
        result=eval("0b"+src)
        result_label.config(text=f"変換結果は {result} です。")
    except:
        result_label.config(text="不正な形式です。")

btn=tk.Button(root,text="10進数に変換",command=convert)
btn.pack()

result_label = tk.Label(root,text="2進数を入力してボタンを押してください")
result_label.pack()

root.mainloop() # モジュール化する場合は追加必須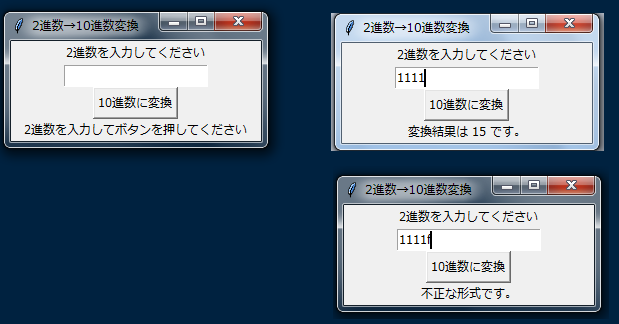
- eval("0b"+src)
- evalメソッドでstr型を式として計算し、結果を返すことができる事と、2進数は”0b”で表記できる事を利用して10進数を得ています。同様に”0x”で16進数、”0o”で8進数を表記することで変換可能になります。
ラジオボタンを利用して〇進数→10進数変換ツール
import tkinter as tk

def convert():
    src=entry.get()
    try:
        if val.get() == 0:
            result=eval("0b"+src)
        elif val.get() == 1:
            result=eval("0o"+src)
        else:
            result=eval("0x"+src)
        mess = f"変換結果は {result} です。"
    except:
        mess="不正な形式です。"
    result_label.config(text=mess)

root = tk.Tk()
root.geometry("250x200")
root.title("〇進数→10進数変換")
tk.Label(root, text="チェックしている〇進数を入力してください").pack()

# ラジオボタンの設置
val = tk.IntVar()
val.set(0)

r0 = tk.Radiobutton(text = '2進数', variable = val, value = 0)
r0.pack()
r1 = tk.Radiobutton(text = '8進数', variable = val, value = 1)
r1.pack()
r2 = tk.Radiobutton(text = '16進数', variable = val, value = 2)
r2.pack()

entry=tk.Entry(root)
entry.pack()

btn=tk.Button(root,text="10進数に変換",command=convert)
btn.pack()

result_label = tk.Label(root,text="入力後にボタンを押してください")
result_label.pack()

root.mainloop()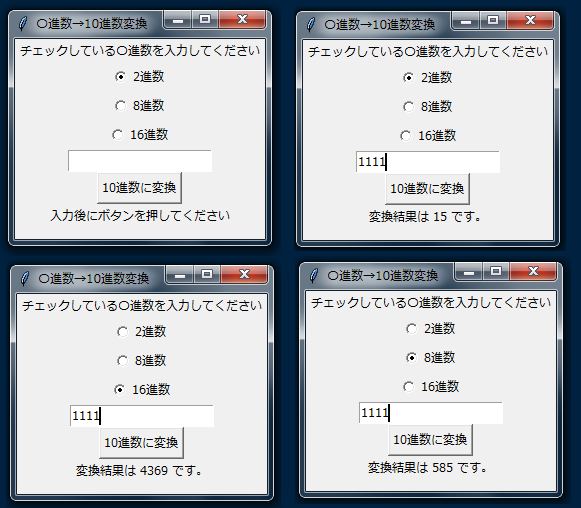
ラジオボタンについてはこちら
Python ラジオボタン(Radiobutton)を作成する
この方法以外にもチェックボックスやコンボボックスを利用しても、このようなツールを作成することが可能です。
コンボボックスについてはこちら
【tkinter.ttk】Comboboxの使い方【Python】
今回はtkinterの扱いに慣れようということで、いくつかサンプルコードを他にも載せておきたいと思います。
tkinterをクラスで扱ったサンプルコード
import tkinter as tk

class Application(tk.Frame):
    def __init__(self, master=None):
        super().__init__(master)
        self.master = master
        self.pack()
        self.create_widgets()

    def create_widgets(self):
        self.hi_there = tk.Button(self)
        self.hi_there["text"] = "Hello World\n(click me)"
        self.hi_there["command"] = self.say_hi
        self.hi_there.pack(side="top")

        self.quit = tk.Button(self, text="QUIT", fg="red",
                              command=self.master.destroy)
        self.quit.pack(side="bottom")

    def say_hi(self):
        print("hi there, everyone!")

root = tk.Tk()
app = Application(master=root)
app.mainloop()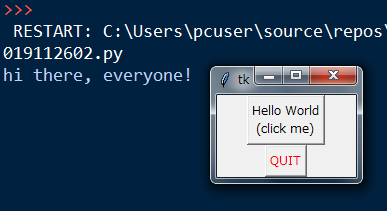
from tkinter import *

class App(Frame):
    def __init__(self, master=None):
        super().__init__(master)
        self.pack()

        self.entrythingy = Entry()
        self.entrythingy.pack()

        # here is the application variable
        self.contents = StringVar()
        # set it to some value
        self.contents.set("this is a variable")
        # tell the entry widget to watch this variable
        self.entrythingy["textvariable"] = self.contents

        # and here we get a callback when the user hits return.
        # we will have the program print out the value of the
        # application variable when the user hits return
        self.entrythingy.bind('<Key-Return>',
                              self.print_contents)

    def print_contents(self, event):
        print("hi. contents of entry is now ---->",
              self.contents.get())

root = Tk()
app = App(master=root)
app.mainloop()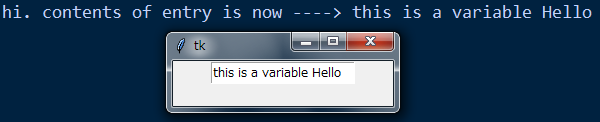
import tkinter as tk

class App(tk.Frame):
    def __init__(self, master=None):
        super().__init__(master)
        self.pack()

# create the application
myapp = App()

#
# here are method calls to the window manager class
#
myapp.master.title("My Do-Nothing Application")
myapp.master.maxsize(1000, 400)

# start the program
myapp.mainloop()
フィートをメートル変換するGUIツール
from tkinter import *
from tkinter import ttk

def calculate(*args):
    try:
        value = float(feet.get())
        meters.set((0.3048 * value * 10000.0 + 0.5)/10000.0)
    except ValueError:
        pass

root = Tk()
root.title("Feet to Meters")

mainframe = ttk.Frame(root, padding="3 3 12 12")
mainframe.grid(column=0, row=0, sticky=(N, W, E, S))
root.columnconfigure(0, weight=1)
root.rowconfigure(0, weight=1)

feet = StringVar()
meters = StringVar()

feet_entry = ttk.Entry(mainframe, width=7, textvariable=feet)
feet_entry.grid(column=2, row=1, sticky=(W, E))

ttk.Label(mainframe, textvariable=meters).grid(column=2, row=2, sticky=(W, E))
ttk.Button(mainframe, text="Calculate", command=calculate).grid(column=3, row=3, sticky=W)

ttk.Label(mainframe, text="feet").grid(column=3, row=1, sticky=W)
ttk.Label(mainframe, text="is equivalent to").grid(column=1, row=2, sticky=E)
ttk.Label(mainframe, text="meters").grid(column=3, row=2, sticky=W)

for child in mainframe.winfo_children(): child.grid_configure(padx=5, pady=5)

feet_entry.focus()
root.bind('<Return>', calculate)

root.mainloop()- .grid(column = 2、row = 2、sticky =(W、E))
- ウィジェットが作成されたばかりの場合、Tkはウィジェットを他のウィジェットに対してどのように配置するかを知らないため、自動的に画面に表示されません。
「grid」オプションで、アプリケーションのレイアウトグリッドを覚えて、各ウィジェットを適切な列(1、2または3)、および行(1、2または3)に配置します。
「sticky」オプションは、ウィジェットがコンパスの方向を使用して、グリッドセル内に並ぶ事を示します。したがって、「w」(西)はウィジェットをセルの左側に固定することを意味し、「we」(西-東)はウィジェットをセルの左側と右側の両方に固定することを意味します。
イベント処理
from tkinter import *
from tkinter import ttk
root = Tk()
l =ttk.Label(root, text="Starting...")
l.grid()
l.bind('<Enter>', lambda e: l.configure(text='Moved mouse inside'))
l.bind('<Leave>', lambda e: l.configure(text='Moved mouse outside'))
l.bind('<1>', lambda e: l.configure(text='Clicked left mouse button'))
l.bind('<Double-1>', lambda e: l.configure(text='Double clicked'))
l.bind('<B3-Motion>', lambda e: l.configure(text='right button drag to %d,%d' % (e.x, e.y)))
root.mainloop()- bind(sequence, func, add='')
- ウィジェットコマンドからの bind メソッドによって、あるイベントを待つことと、そのイベント型が起きたときにコールバック関数を呼び出すことができるようになります。
・sequenceは対象とするイベントの型を示す文字列です。
・funcは一引数を取り、イベントが起きるときに呼び出される Python 関数です。
・addはオプションで、 '' か '+' のどちらかです。空文字列を渡すことは、このイベントが関係する他のどんなバインドをもこのバインドが置き換えることを意味します。 '+' を使う仕方は、この関数がこのイベント型にバインドされる関数のリストに追加されることを意味しています。
詳しくは以下を確認
tkinterを使いこなすことで色々なGUIツール開発ができそうですね。